Building a Login Form Application with C# .NET and MySQL Database

In this tutorial, we’ll walk through the process of creating a login form application using C# .NET and MySQL database. We’ll utilize XAMPP server for our backend setup. By the end, you’ll have a fully functional application with three main windows: Login Page, Register Page, and Profile Page.
Let’s dive in step by step:
Step 1: Creating a Windows Form Application
Start by creating a new C# project with .NET framework. Add three form windows to your project: LoginForm, RegisterForm, and ProfileForm.
Step 2: Designing UI for Our Forms
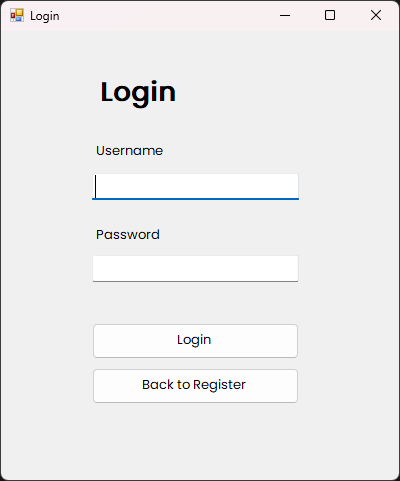
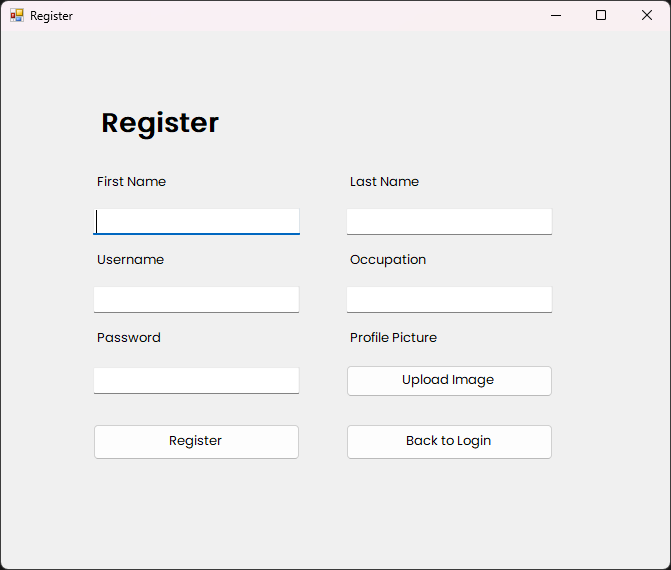
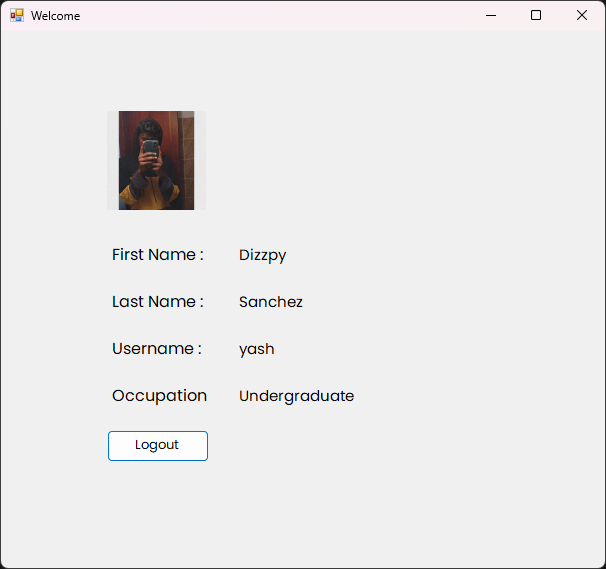
For the Login Page, add textboxes for username and password, along with login and register buttons. For the Register Page, include textboxes for first name, last name, username, occupation, and password. Additionally, add buttons for profile picture upload, registration, and navigation to the login page. Finally, design the Profile Page with elements to display profile information and a logout button.
Here are Ui designs


Step 3: Adding Required Packages
Install the MySqlConnector package using NuGet Package Manager and import MySqlConnector namespace into your project.
Step 4: Preparing Our Database
Using XAMPP and phpMyAdmin, create a new database named csharploginform and a table named users. Add columns for ID (auto-incrementing), first name, last name, username, occupation, password, and profile picture.
CREATE TABLE IF NOT EXISTS userdetails (
    ID INT AUTO_INCREMENT PRIMARY KEY,
    FirstName VARCHAR(255) NOT NULL,
    Username VARCHAR(255) UNIQUE NOT NULL,
    Occupation VARCHAR(255),
    Password VARCHAR(255) NOT NULL,
    ProfileImage LONGBLOB
);
Step 5: Coding Our Login Page
In the LoginForm.cs file, implement the code to handle user login authentication. This includes connecting to the MySQL database, executing a SELECT query to verify the credentials, and navigating to the Profile Page upon successful login.
using System;
using System.Collections.Generic;
using System.ComponentModel;
using System.Data;
using System.Drawing;
using System.Linq;
using System.Text;
using System.Threading.Tasks;
using System.Windows.Forms;
using LoginForm_CSharp.Views;
using MySqlConnector;

namespace LoginForm_CSharp
{
    public partial class LoginForm : Form
    {
        MySqlConnection connection = new MySqlConnection("server=localhost;database=csharploginform;port=3306;username=root;password=");
        MySqlCommand command;
        MySqlDataReader dr;
        public LoginForm()
        {
            InitializeComponent();
        }

        private void LoginButton_Click(object sender, EventArgs e)
        {
            try
            {
                if (string.IsNullOrEmpty(LogUsernameText.Text) || string.IsNullOrEmpty(LogPasswordText.Text))
                {
                    MessageBox.Show("Please enter username and password", "Error", MessageBoxButtons.OK, MessageBoxIcon.Error);
                    return;
                }

                connection.Open();
                string selectQuery = "SELECT * FROM users WHERE Username = @Username AND Password = @Password";
                command = new MySqlCommand(selectQuery, connection);
                command.Parameters.AddWithValue("@Username", LogUsernameText.Text);
                command.Parameters.AddWithValue("@Password", LogPasswordText.Text);
                dr = command.ExecuteReader();

                if (dr.Read())
                {
                    MessageBox.Show("Login Successful", "Success", MessageBoxButtons.OK, MessageBoxIcon.Information);
                    this.Hide();
                    string LoggedUserName = LogUsernameText.Text;
                    DashboardForm dashboardForm = new DashboardForm(LoggedUserName);
                    dashboardForm.Show();
                }
                else
                {
                    MessageBox.Show("Invalid username or password", "Error", MessageBoxButtons.OK, MessageBoxIcon.Error);
                }
            }
            catch (Exception ex)
            {
                MessageBox.Show(ex.Message);
            }
            finally
            {
                if (connection.State == ConnectionState.Open)
                {
                    connection.Close();
                }
            }

        }

        private void GoToRegisterButton_Click(object sender, EventArgs e)
        {
            this.Hide();
            RegisterForm registerForm = new RegisterForm();
            registerForm.Show();
        }
    }
}
Step 6: Coding the Register Page
In the RegisterForm.cs file, write the code to handle user registration. This involves checking for empty fields, querying the database to ensure username uniqueness, inserting user data into the database, and navigating to the Profile Page upon successful registration.
using System;
using System.Collections.Generic;
using System.ComponentModel;
using System.Data;
using System.Drawing;
using System.Linq;
using System.Text;
using System.Threading.Tasks;
using System.Windows.Forms;
using LoginForm_CSharp.Views;
using MySqlConnector;


namespace LoginForm_CSharp
{
    public partial class RegisterForm : Form
    {
        MySqlConnection connection = new MySqlConnection("server=localhost;database=csharploginform;port=3306;username=root;password=");
        public RegisterForm()
        {
            InitializeComponent();
        }

        private void GotoToLoginButton_Click(object sender, EventArgs e)
        {
            this.Hide();
            LoginForm loginForm = new LoginForm();
            loginForm.Show();
        }

        private void RegisterButton_Click(object sender, EventArgs e)
        {
            try
            {
                if (string.IsNullOrEmpty(RegFirtsNameText.Text) || string.IsNullOrEmpty(RegLastNameText.Text) || string.IsNullOrEmpty(RegUsernameText.Text) || string.IsNullOrEmpty(RegOccuText.Text) || string.IsNullOrEmpty(RegPasswordText.Text))
                {
                    MessageBox.Show("Please Fill The All Information");
                    return;
                }
                connection.Open();
                MySqlCommand mySqlCommand1 = new MySqlCommand("SELECT * FROM users WHERE Username = @Username", connection);
                mySqlCommand1.Parameters.AddWithValue("@Username", RegUsernameText.Text);
                bool userExists = false;

                using (var dr1 = mySqlCommand1.ExecuteReader())
                    if (userExists = dr1.HasRows) MessageBox.Show("Username Allready Exist");

                if (!userExists)
                {
                    string iquery = "INSERT INTO csharploginform.users(`ID`, `FirstName`, `LastName`, `Username`, `Occupation`, `Password`, `ProfilePicture`) VALUES(NULL,@FirstName, @LastName,@Username, @Occupation, @Password, @ProfilePicture)";
                    MySqlCommand commandDatabase = new MySqlCommand(iquery, connection);
                    commandDatabase.Parameters.AddWithValue("@FirstName", RegFirtsNameText.Text);
                    commandDatabase.Parameters.AddWithValue("@LastName", RegLastNameText.Text);
                    commandDatabase.Parameters.AddWithValue("@Username", RegUsernameText.Text);
                    commandDatabase.Parameters.AddWithValue("@Occupation", RegOccuText.Text);
                    commandDatabase.Parameters.AddWithValue("@Password", RegPasswordText.Text);

                    if (RegProPicButton.Image != null)
                    {
                        byte[] imageData = ImageToByteArray(RegProPicButton.Image);
                        commandDatabase.Parameters.AddWithValue("@ProfilePicture", imageData);
                    }
                    else
                    {
                        commandDatabase.Parameters.AddWithValue("@ProfilePicture", DBNull.Value);
                    }


                    commandDatabase.CommandTimeout = 60;
                    commandDatabase.ExecuteNonQuery();
                    MessageBox.Show("Account Created Successful", "Success", MessageBoxButtons.OK, MessageBoxIcon.Information);
                    this.Hide();
                    string LoggedUserName = RegUsernameText.Text;
                    DashboardForm dashboardForm = new DashboardForm(LoggedUserName);
                    dashboardForm.Show(); ;
                }
            }
            catch(Exception ex)
            {
                MessageBox.Show("An Error" + ex.Message, "Error");
            }
            finally
            {
                connection.Close();
            }
        }


        private void RegProPicButton_Click(object sender, EventArgs e)
        {
            OpenFileDialog fileDialog = new OpenFileDialog();
            fileDialog.Filter = "Image Files|*jpg;*jpeg;*png";
            fileDialog.Title = "Select an Image File";

            if (fileDialog.ShowDialog() == DialogResult.OK)
            {
                RegProPicButton.Image = new Bitmap(fileDialog.FileName);
            }
        }

        private byte[] ImageToByteArray(Image image)
        {
            ImageConverter converter = new ImageConverter();
            return (byte[])converter.ConvertTo(image, typeof(byte[]));
        }
    }
}
Step 7: Creating the Profile Page
In the DashboardForm.cs (Profile Page) file, develop the code to display user profile information fetched from the database. This includes querying the database based on the logged-in user's username and populating the form fields with the retrieved data.
using MySql.Data.MySqlClient;
using System;
using System.Collections.Generic;
using System.ComponentModel;
using System.Data;
using System.Drawing;
using System.IO;
using System.Linq;
using System.Text;
using System.Threading.Tasks;
using System.Windows.Forms;

namespace LoginForm_CSharp.Views
{
    public partial class DashboardForm : Form
    {
        private readonly string username;
        private readonly MySqlConnection connection;
        public DashboardForm(string username)
        {
            InitializeComponent();
            this.username = username;
            connection = new MySqlConnection("server=localhost;database=csharploginform;port=3306;username=root;password=");
            DisplayProfile();
        }

        private void DisplayProfile()
        {
            try
            {
                connection.Open();
                string query = "SELECT * FROM users WHERE Username = @Username";
                MySqlCommand command = new MySqlCommand(query, connection);
                command.Parameters.AddWithValue("@Username", username);

                using (MySqlDataReader reader = command.ExecuteReader())
                {
                    if (reader.Read())
                    {
                        DFirstName.Text = reader["FirstName"].ToString();
                        DLastName.Text = reader["LastName"].ToString();
                        DUserName.Text = reader["Username"].ToString();
                        DOccupation.Text = reader["Occupation"].ToString();

                        if (reader["ProfilePicture"] != DBNull.Value)
                        {
                            byte[] img = (byte[])reader["ProfilePicture"];
                            using (MemoryStream ms = new MemoryStream(img))
                            {
                                ProfilePic.Image = Image.FromStream(ms);
                            }
                        }
                        else
                        {
                            MessageBox.Show("No Profile Picture Found");
                            this.Close();
                        }
                    }
                }
            }
            catch(Exception ex)
            {
                MessageBox.Show(ex.Message);
                this.Close();
            }

        }

        private Image ResizeImage(Image image, int width, int height)
        {
            Bitmap resizedImage = new Bitmap(width, height);
            using (Graphics graphics = Graphics.FromImage(resizedImage))
            {
                graphics.DrawImage(image, 0, 0, width, height);
            }
            return resizedImage;
        }

        private void LogoutButton_Click(object sender, EventArgs e)
        {
            this.Hide();
            LoginForm loginForm = new LoginForm();
            loginForm.Show();
        }
    }
}
Step 8: Testing Your Application
Once the development is complete, test your application to ensure everything works as expected. Verify user login, registration, and profile display functionalities.
That’s it! You’ve successfully built a login form application with C# .NET and MySQL database. For the full project code, check out my GitHub repository here.
Dizzpy | Happy coding! 🖥️🥰
